Overview
WildFire allows users to submit files to the Palo Alto Networks secure, cloud-based, virtualized environment where they are automatically analyzed for malicious activity. Palo Alto Networks lets the file run in a vulnerable environment and watches for specific malicious behaviors and techniques, such as modifying system files, disabling security features, or using a variety of methods to evade detection. Zipped and compressed HTTP (GZIP) files are inspected and any internal EXE and DLL files can be submitted for analysis.
The WildFire portal can be used to view the detailed analysis of the analyzed files to see which users were targeted, applications used, and malicious behavior observed. The WildFire portal can also be configured to send email notifications when results are available for review.
Topology

How to configure:
- Go to Device > Setup > WildFire tab.
- Choose the default-cloud, maximum file size of 2MB.
- Specify the information to be forwarded to the WildFire server.
- Source IP—Source IP address that sent the suspected file.
- Source Port—Source port that sent the suspected file.
- Destination IP—Destination IP address for the suspected file.
- Destination Port—Destination port for the suspected file.
- Vsys—Firewall virtual system that identified the possible malware.
- Application—User application that was used to transmit the file.
- User—Targeted user.
- URL—URL associated with the suspected file.
- Filename—Name of the file that was sent.
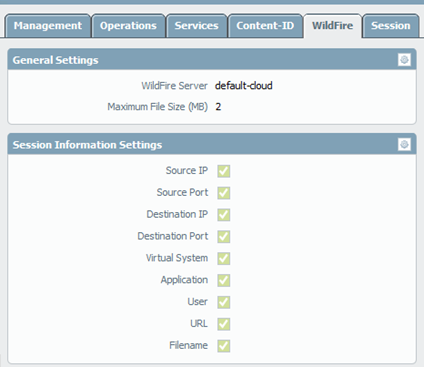
By default, all the options are selected but they are not required for WildFire to work. Deselect any information that shouldn't be sent to the WildFire cloud.
- If a Decryption policy is used, WildFire can be enabled to upload the decrypted files.
- Go to Device > Setup > Content-ID > Enable “Allow Forwarding of Decrypted Content.”

By default, files that are decrypted will not be forwarded to the WildFire cloud, so adjusting this value in PAN-OS 6.0 will change the behavior.
- Go to Objects > Security Profiles > File Blocking.
- Add a rule, by Name.
- Enter a rule name (up to 31 characters).
- • Applications— select any.
- • File Types—Select the file types exe, dll.
- • Direction—Select the direction of the file transfer (Upload, Download, or Both).
- • Action—Select the action taken when the selected file types are detected: forward (The file is automatically sent to WildFire).
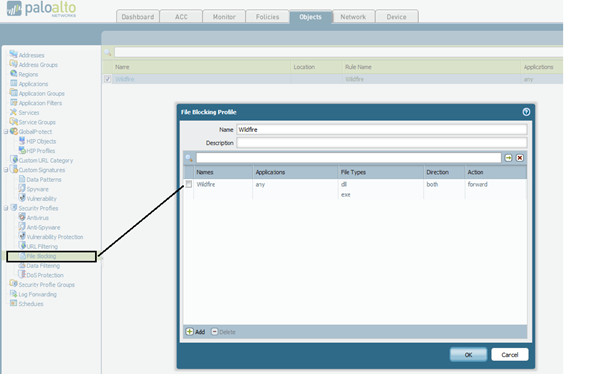
- Apply the File Blocking profile in Policies > Security > to the rule on which WildFire protection should be applied.
- Click OK.
- Commit the configuration.

WildFire CLI commands
After the basic configuration is complete, the following commands provide the details of the best server selected. To test the connectivity:
> test wildfire registration
This test may take a few minutes to finish. Do you want to continue? (y or n)
Test wildfire
wildfire registration: successful
download server list: successful
select the best server: va-s1.wildfire.paloaltonetworks.com
Initial registration can be done only on the active unit in an Active/Passive cluster.
Note: Do not use PING to test connectivity to the server. Ping requests are disabled on the WildFire server. Best practice to test connectivity is to Telnet to the server on port 443.
To verify, if any files have been forwarded to the server, use the following command:
> show wildfire status
Connection info:
Wildfire cloud: default cloud
Status: Idle
Best server: va-s1.wildfire.paloaltonetworks.com
Device registered: yes
Service route IP address: 10.30.24.52
Signature verification: enable
Server selection: enable
Through a proxy: no
Forwarding info:
file size limit (MB): 2
file idle time out (second): 90
total file forwarded: 0
forwarding rate (per minute): 0
concurrent files: 0
The total file forwarded counter will provide the number of files being forwarded to the server.
To view WildFire Logs
- Go to the Monitor > Logs > Data Filtering page:

Use data filtering logs to check the status of the file.
If you see only “forward” with no “wildfire-upload-success” or “wildfire-upload-skip,” then the file is either signed by a trusted file signer, or a benign sample the cloud has already seen.
Below is an explanation of the possible actions:
Forward
Data plane detected a Potentially Executable file on a WildFire-enabled policy. The file is buffered in the management plane.
If only “forward” is displayed for a specific file, then the file is either signed by a trusted file signer, or a benign sample that the cloud has already seen. In either case, no further action is performed on the file, and no further information is sent to the cloud (not even session information for previously seen benign files). There will not be an entry in the WildFire Web portal for these files.
To view the count of how many PE files have been checked, found to be clean or uploaded, issue the command:
> show wildfire statistics
statistics for wildfire
DP receiver reset count: 12
File caching reset cnt: 12
FWD_ERR_CONN_FAIL 1
data_buf_meter 0%
msg_buf_meter 0%
ctrl_msg_buf_meter 0%
fbf_buf_meter 0%
wildfire-upload-success
This means that the file wasn't signed by a trusted signer, and the file hasn't yet been seen by the cloud. In this case, the file (and session info) was uploaded to the cloud for analysis.
wildfire-upload-skip
This means the file was already seen by the cloud.
- If the file had been previously determined to be malicious, then the report, previously generated when the verdict was made, appears on the WildFire server.
- If the file was not malicious and was determined to be benign, then the report is not shown on the WildFire server.
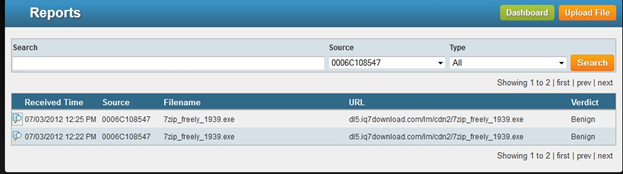
WildFire Portal
To access the WildFire portal, go to https://wildfire.paloaltonetworks.com and log in using your Palo Alto Networks support credentials or your WildFire account. The portal opens to display the dashboard, which lists summary report information for all of the firewalls associated with the specific WildFire account or support account, as well as any files that have been uploaded manually. The display includes the number of analyzed files and indicates how many are infected with malware, benign, or pending analysis.
Other useful commands are
- show wildfire disk-usage
- debug wildfire dp-status


No comments:
Post a Comment