Wednesday 31 May 2017

Configure and Manage ASA FirePOWER Module using Management Center

Since Cisco’s acquisition of SourceFire in 2013, Cisco has incorporated one of the best leading Intrusion Prevention System (IPS/IDS) technologies into its “next-generation” firewall product line. Cisco’s ASA firewalls with Sourcefire’s FirePOWER Services are designed to provide contextual awareness to proactively assess threats, correlate intelligence, and optimize defenses to protect networks. I will walk you through step-by-step Cisco ASA 5506-X FirePOWER Configuration Example. The configuration also applies to the product family, ASA 5508-X, 5516-X and 5585-X.
If you are looking for best practice, baseline configuration of the ASA 5506-X before moving on to setting up the FirePOWER module, please read: Basic Cisco ASA 5506-x Configuration Example, or download configuration template for FREE.
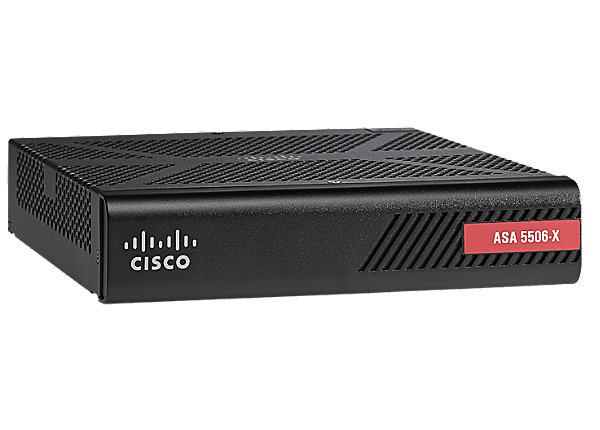
ASA FirePOWER SourceFire Configuration

Cisco ASA 5506-X FirePOWER Configuration Example

Introduction

Cisco ASA 5506-X with FirePOWER module is the direct upgrade path from legacy Cisco ASA5505. It incorporated the industry leading IPS technologies, provides next-generation Intrusion Prevention (NGIPS), Application Visibility and Control (AVC), Advanced Malware Protection (AMP) and URL Filtering. It is available in desktop model 5506-X, integrated wireless access point model 5506W-X and a ruggedized model 5506H-X for industrial control systems and critical infrastructure environment.

Major Differences Compared to Legacy ASA 5500s

  • The new “X” models are running on multicore 64-bit processors compared with single core 32-bit processors on older ASA models.
  • The “X” models have much higher CPU and Memory capacity, provide much higher traffic throughput compared to the same class. It has also made itself FirePOWER ready.
  • The “X” models are next-generation firewalls. With subscription to additional licenses, you can have either Cloud based Web Security / Essentials or running local FirePOWER in software. (except for ASA 5585-X in hardware) The Cloud based security suite was Cisco’s legacy solution before adopting SourceFire solution. I recommend getting the FirePOWER option instead of the Cloud based solution, since it may be phased out in the near future.
  • Routed interfaces instead of switched interface on the legacy ASA5505. The Cisco ASA5506-X has 8xGE routed interfaces, 1xGE MGMT, RJ45+USB mini console ports. It provides greater flexibilities of using physical interfaces (as opposed using sub-interfaces) to create multiple security zones using DMZ networks. This change is appreciated by medium to enterprise sized businesses customers. However for SOHO users who used to connect PCs directly to the ASA 5505, you will need to add a layer 2 switch on the LAN.
  • The new ASA 5506W-X provides integrated Wireless Access Point, which is good for SOHO users. The ruggedized model 5506H-X, can be suitable for outdoor applications
  • The new ASA 5506-X has a new interface naming conversion that starts from Gig1/1 instead of Gig0/0. I’m not sure why Cisco made such change, it only added unnecessary translation work for ones migrating from legacy models.
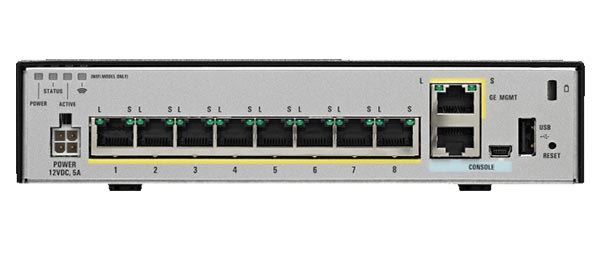
ASA FirePOWER SourceFire Configuration (2)

Traffic Flow

Similar to deploying a standalone IPS solution, the integrated FirePOWER module supports “inline” mode and “passive monitoring” mode. “Inline” mode provides additional benefits than monitoring mode. FirePOWER deployed in “inline” mode provides best case deep inspection analysis before packets are returned to the ASA main plane. It proactively takes action when malicious traffic is detected.
When traffic enters ASA’s ingress interface:
  1. The ASA decrypts the traffic if it was part of an established VPN tunnel.
  2. Packets are checked against firewall policies such as ACL, NAT and Inspection.
  3. Optionally, traffic is sent to the FirePOWER Module for deeper level inspection. You may configure to send all traffic or only high risk traffic to the FirePOWER module to conserve system resources.
  4. Traffic passed FirePOWER inspection is returned to the ASA main engine for next step routing decision.
  5. Traffic is then passed to the ASA’s egress interface to be forwarded to the rest of the network.
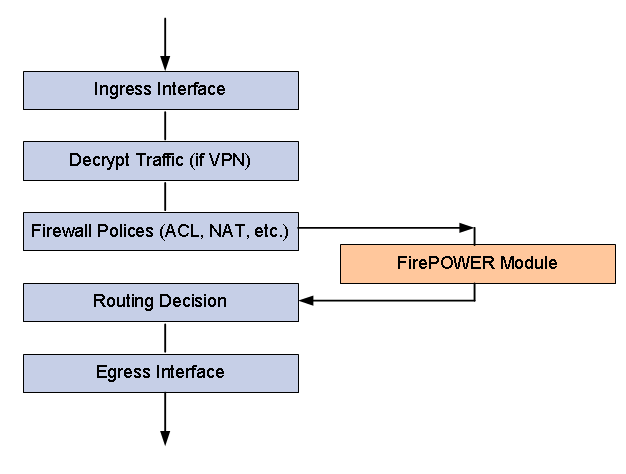
ASA FirePOWER SourceFire Configuration (1)

Licensing Options

In order to utilize any of the ASA’s next-generation firewall features, Cisco made customers order subscription based licenses for the FirePOWER module to work. The subscription based licenses can be purchased annually, 3 or 5 years with discount. Here are list of licenses available:
  • Intrusion detection and prevention (IPS license)
  • Application Visibility and Control (AVC)
  • File control and advanced malware protection (AMP)
  • Application, user, and URL control (URL Filtering)
  • IPS license is required for the AVC, AMP and URL Filtering license.

Management Options

Even though the FirePOWER module is integrated in to one ASA platform, it is managed separately from the ASA configuration. You have two options of managing and operating the FirePOWER module- Distributed management model and Centralized management model.

Distributed model using ASDM: For standalone single site deployment.

Suitable for SOHO customers who do not have more than 3 locations and do not want to manage a separate sever infrastructure.

Centralized model using FirePOWER Management Center

The Management Console is a hardware or virtual appliance installed centrally to manage multiple FirePOWER deployments at same time. Suitable for enterprise customers who have more than 5 locations deployed with FirePOWER.
If you are looking for best practice, baseline configuration of the ASA 5506-X before moving on to setting up the FirePOWER module, please read: Basic Cisco ASA 5506-x Configuration Example, or download configuration template for FREE.
If you’d like to have a second opinion on your network design or engage me in a consulting project, please check out the services I offer.
In this example, we’ll step through Cisco ASA 5506-X FirePOWER configuration example and activate the FirePOWER module in a typical network. We used ASA 5506-X running code 9.5(2) and ASDM version 7.5(2).
Before proceed, please make sure the followings are taken into consideration. If you are configuring a brand new ASA 5506-X, you may skip to Step 1.
  • It is not recommended to configure and run Could Web Security (ScanSafe) at the same time running FirePOWER. Technically it is possible to split traffic to be inspected by one of the method respectively, however it is not recommended.
  • Do not enable ASA’s HTTP inspection features since FirePOWER provides more advance HTTP inspection than ASA.
  • Cisco Mobile User Security (MUS) is not compatible with FirePOWER.

Cisco ASA 5506-X FirePOWER Configuration Example Part 2

Step 1: Update ASA software and ASDM code

Download the recent stable release from Cisco.com and transfer the codes to the ASA.
ASA FirePOWER SourceFire Configuration (2)
Set the system to boot to the new image. Configure the ASDM image to be used.
ASA1(config)# boot system disk0:/asa952-lfbff-k8.SPA
ASA1(config)# asdm image disk0:/asdm-752.bin 
Write memory and verify the bootvar is set correctly. Reboot the system to load the new image.
ASA FirePOWER SourceFire Configuration (3)

Step 2: Verifying FirePOWER module status

Using “show module”, you can verify the FirePOWER module is online and healthy.
ASA1# sho module

Mod Card Type                                  Model             Serial No.
---- -------------------------------------------- ------------------ -----------
ASA 5506-X with FirePOWER services, 8GE, AC, ASA5506           JAD19280XXX
sfr FirePOWER Services Software Module          ASA5506           JAD19280XXX
Mod MAC Address Range                 Hw Version   Fw Version   Sw Version
---- --------------------------------- ------------ ------------ ---------------
1 5897.bd27.58d6 to 5897.bd27.58df 1.0         1.1.1       9.5(2)
sfr 5897.bd27.58d5 to 5897.bd27.58d5 N/A         N/A         5.4.1-211
Mod SSM Application Name           Status           SSM Application Version
---- ------------------------------ ---------------- --------------------------
sfr ASA FirePOWER                 Up               5.4.1-211
Mod Status             Data Plane Status     Compatibility
---- ------------------ --------------------- -------------
1 Up Sys             Not Applicable
sfr Up                 Up

Step 3: Physical cabling

On ASA 5506-X through ASA 5555-X platforms, the ASA itself and FirePOWER module share the same physical management interface (ASA 5585-X has dedicated management interface for each). For the shared management interface, you have two options to configure.
Option 1: Dedicate the management interface to FirePOWER, and manage the ASA through its inside or outside interface.
In order to run in this mode, you must not configure a name on the management interface. You need to configure a FirePOWER management IP on the same network as inside interface of the ASA. In our example, we have 192.168.0.1 on the inside interface and 192.168.0.2 on the management interface.
Keep in mind that FirePOWER management interface must have internet access for signature updates and communication to the Management Center. Traffic cannot pass through the ASA’s backbone. Instead, management traffic must enter and exit through the same physical port. Illustrated below is a typical cabling setup where management interface is connected to the same layer 2 switch as the inside network.
ASA FirePOWER SourceFire Configuration (4)
Option 2: Share management interface between ASA and FirePOWER
If you have a layer 3 device such as a layer 3 switch on your network, this method of configuration is recommended. The ASA and the FirePOWER module share the same physical management interface with different IP addresses. The management IP addresses are on a separate network or VLAN, dedicated to management traffic. Internet bound traffic initiated from the management IP is routed through the layer 3 device to the inside interface of the ASA.
ASA FirePOWER SourceFire Configuration (5)
In our example, we assigned 192.168.1.1 for ASA management and 192.168.1.2 for FirePOWER management. Please note that the IP address under management interface configuration only reflects the ASA management IP. FirePOWER management IP is not shown under “show running-config”.
interface Management1/1
 management-only
 nameif management
 security-level 100
 ip address 192.168.1.1 255.255.255.0
Step 4: Initial configuration of FirePOWER module
On console CLI interface, enter the FirePOWER module using session command:
ASA1# session sfr
Default username / password: admin / Sourcefire
The first time you access the FirePOWER module, you are prompted for basic configuration parameters.
System initialization in progress. Please stand by.
You must change the password for 'admin' to continue.
Enter new password:
Confirm new password:
You must configure the network to continue.
You must configure at least one of IPv4 or IPv6.
Do you want to configure IPv4? (y/n) [y]:
Do you want to configure IPv6? (y/n) [n]:
Configure IPv4 via DHCP or manually? (dhcp/manual) [manual]:
Enter an IPv4 address for the management interface [192.168.45.45]: 192.168.1.2
Enter an IPv4 netmask for the management interface [255.255.255.0]:
Enter the IPv4 default gateway for the management interface []: 192.168.1.1
Enter a fully qualified hostname for this system [Sourcefire3D]:
Enter a comma-separated list of DNS servers or 'none' []:
Enter a comma-separated list of DNS servers or 'none' []: 4.2.2.2
Enter a comma-separated list of search domains or 'none' [example.net]:
If your networking information has changed, you will need to reconnect.
For HTTP Proxy configuration, run 'configure network http-proxy'
Applying 'Default Allow All Traffic' access control policy.
At the end of this step, we have completed the initial setup of the ASA and the FirePOWER module. A “Default Allow All Traffic” policy is activated on the FirePOWER module. It will inspect and monitor all traffic being sent to the module. It will not drop any traffic.
Now you may proceed to Configure and Manage ASA FirePOWER Module using ASDM or Configure and Manage ASA FirePOWER Module using FirePOWER Management Center.
If you are looking for best practice, baseline configuration of the ASA 5506-X before moving on to setting up the FirePOWER module, please read: Basic Cisco ASA 5506-x Configuration Example, or download configuration template for FREE.

Configure and Manage ASA FirePOWER Module using ASDM Part 3

As mentioned previously, there are two ways to configure and manage ASA FirePOWER module using ASDM and FirePOWER Management Center. We’ll cover in both options.

Configure and Manage ASA FirePOWER Module using ASDM

Preparation

Step 1: Enable HTTP service on the ASA
By default, HTTP service is not enabled on the ASA. You need first enable HTTP service and specify the network and interface where access is allowed.
http server enable
http 192.168.0.0 255.255.255.0 inside
http 192.168.1.0 255.255.255.0 management
Step 2: Open a web browser and go to the management IP of the ASA
In our example, enter the following URL: https://192.168.1.1/admin. Here you may choose to install the ASDM client on your local computer or use Run ASDM directly from a Java-enabled browser. I recommend download a local copy of the ASDM client and use without going through the web browser every time.

Licensing FirePOWER features using ASDM

Launch and Log in ASDM using the ASA’s username and password. (Not the FirePOWER)
Optionally you may change or update the management IP of the FirePOWER module using the Setup Wizard.
ASA FirePOWER SourceFire Configuration (6)
To configure the FirePOWER module, you must login ASDM with an ASA username that has privilege level 15. If you could not find the FirePOWER Configuration option and see the warning message under ASA FirePOWER Status tab, that’s because you logged in using an account without privilege 15.
ASA FirePOWER SourceFire Configuration (7)
In ASDM, choose Configuration – ASA FirePOWER Configuration tab on the lower left corner and click “Licenses”.
ASA FirePOWER SourceFire Configuration (8)ASA FirePOWER SourceFire Configuration (9)
If you have not added any licenses, you will see a blank panel with the only option “Add New License” option. Click on “Add New License”.
The licensing procedure goes in the following order:
  1. Purchase the license from your Cisco vendor.
  2. Receive a Product Authorization Key (PAK) either by email or by physical mail.
  3. Go to Cisco Product License Registration portal http://www.cisco.com/go/license to generate a license file.
  4. Copy and paste the license hash strings into the FirePOWER license tab and activate.
Here are the screenshots for each step.
Go to http://www.cisco.com/go/license and enter PAK. Click on Fullfil
ASA FirePOWER SourceFire Configuration (10)
Verify the license description and click on Next.
ASA FirePOWER SourceFire Configuration (11)
Copy the License Key from ASDM – ASA FirePOWER Configuration – Licenses and paste to Cisco web portal.
ASA FirePOWER SourceFire Configuration (12)
ASA FirePOWER SourceFire Configuration (13)
Enter your information and click on Finish.
ASA FirePOWER SourceFire Configuration (14)
Your license file is generated and emailed to you. You can also download it directly. You will receive a .lic file in plain text format.
ASA FirePOWER SourceFire Configuration (15)
Open the .lic file using a text editor like Notepad. Copy and paste the content between “BEGIN” and “END” into the blank field of License on FirePOWER License in ASDM.
— BEGIN SourceFire Product License :
— END SourceFire Product License —
Tip 1: Do not include anything outside the BEGIN and END lines. Sometimes the license comes with “Device” and “Feature” descriptions. You must exclude them.
Tip 2: If you purchased multiple licenses such as Malware and URL Filtering, the licenses will come in one .lic file. You must activate one license at a time. That means, copy & paste one session of the BEGIN and END at a time and activate it. And repeat the same process to activate additional feature licenses. If you tried to copy and paste multiple licenses into the field and activate, you will receive an error “Invalid license key”.
Tip 3: Protection and Control licenses should come with the product when you purchased the ASA 5506-X with FirePOWER. Sometime I have seen customers did not receive the base Protection and Control license PAKs. You will need to open a TAC Service Request and they will generate a license file for you free of charge.
Once all the licenses have been activated, you’ll see a summary like below.
ASA FirePOWER SourceFire Configuration (16)

Send Traffic to FirePOWER Module to be inspected

By default, the ASA does not redirect traffic to the FirePOWER module for additional inspection. It works nothing different from a traditional firewall. The FirePOWER module works like a service card. In the Cisco ASA software architecture, traffic needs to be redirected to the service module using Service Policy configuration. You may create Service Policy on the ASA that identifies specific traffic that you want to send.
In this example, we’ll send all traffic to FirePOWER for inspection. Go to ASDM – Configuration – Firewall – Service Policy Rules and add a new Service Policy. Since we will be sending all traffic to the FirePOWER module, we’ll utilize the existing “global_policy”.
ASA FirePOWER SourceFire Configuration (17)
ASA FirePOWER SourceFire Configuration (18)
It is self-explanatory that you want all traffic to pass through the FirePOWER module when there is a software failure. (Hardware for ASA 5585-X) Apply the rule.
You may choose to configure the Service Policy rule using CLI. Here is the configuration sample..
class-map global-class
 match any
policy-map global_policy
class global-class
 sfr fail-open
It is important to note that FirePOWER only activated the ‘Default Allow All Traffic’ access control policy initially. All traffic redirected to it will be monitored but none will be dropped. You need to configure and fine tune your own FirePOWER policies in a real-world network.
ASA FirePOWER SourceFire Configuration (19)

FirePOWER Code Update and Rule Update

It is a good practice to periodically check and run software code updates, security patches. Similar to anti-virus signature updates, FirePOWER’s rule database also needs to be updated as soon as the new ones are released.

Run updates in ASDM

For standalone installations, you can run updates in ASDM – ASA FirePOWER Configuration – Updates. Please note you need to update all three categories:
  • Product Updates
  • Rule Updates
  • Geolocation Updates
ASA FirePOWER SourceFire Configuration (20)
ASA FirePOWER SourceFire Configuration (21)

Configure and Manage ASA FirePOWER Module using Management Center Part 4

For centralized management model, enterprise customers may manage multiple FirePOWER installs through a single management console. Before Cisco’s acquisition, SourceFire called it Defense Center. Cisco also called it FireSignt Management Console I will cover configure and manage ASA FirePOWER Module using Management Center. Follow the following steps to register a FirePOWER install with the Management Center.

Configure and Manage ASA FirePOWER Module using Management Center

Step 1: Login the ASA through CLI over console or SSH session.

You must login using a user account with privilege 15.

Step 2: Session to the FirePOWER module and complete basic configuration

ASA1# session sfr
Default username / password: admin / Sourcefire
The first time you access the FirePOWER module, you are prompted for basic configuration parameters. Complete the system configuration wizard as prompted.
ASA FirePOWER SourceFire Configuration (22)

Step 3: Register the FirePOWER module to a FirePOWER Management Center

> configure manager add Mgmt_Centr_IP reg_key
Mgmt_Centr_IP is the Management Center’s IP address. Make sure it is reachable from the FirePOWER’s management IP.
reg_key is a secret key that is shared between the Management Center and the FirePOWER install. For example,
> configure manager add 172.31.16.125 mysecretekey
Manager successfully configured.
Please note that FirePOWER will not try to validate its ability to access or register with the Management Center. If you made a mistake, you can delete the configuration and redo.
> configure manager delete
Manager successfully deleted.
That’s all you need to do on the FirePOWER module.

Step 4: Add FirePOWER sensor in Management Console

Login the Management Center and navigate to Devices – Device Management – Add Device
Enter the FirePOWER’s IP address and shared registration key. Click Register.
ASA FirePOWER SourceFire Configuration (23)
ASA FirePOWER SourceFire Configuration (24)
If the registration went successfully, you should see the newly registered FirePOWER sensor in the device list. If it fails, make sure from the Management Center you can reach the FirePOWER management IP and vice versa.

Step 5: Add FirePOWER feature licenses in Management Center

In the Management Center, go to System – Licenses and click on Add New License. Follow the same procedure activating licenses outlined earlier.
ASA FirePOWER SourceFire Configuration (25)

Step 6: Apply licenses to the newly installed FirePOWER module

The Management Center acts as a license repository that manages all the licenses in an organization. A license can be applied to one compatible FirePOWER module at a time. Once the license is used on a FirePOWER module, you may not reuse it on a different module.
To apply the installed licenses to a FirePOWER module, go to Devices – Device Management and click on License. If you have unused and compatible licenses available, you can check the boxes to activate the feature.
ASA FirePOWER SourceFire Configuration (26)
ASA FirePOWER SourceFire Configuration (27)
Above example indicates that we only have Protection license available and it has been applied to this device.

FirePOWER Code Update and Rule Update

It is a good practice to periodically check and run software code updates, security patches. Similar to anti-virus signature updates, FirePOWER’s rule database also need to be updated as soon as the new ones are released.
Run updates in FirePOWER Management Center
One of the benefits of centralized management model is that you only need to download the updates once and push to all compatible FirePOWER modules in the field. To download updates, go to System – Updates. Click on the Download updates button on the lower right corner to make the Management Center to go out to Cisco update center and pull all applicable updates. And you can choose which one you want to install.
ASA FirePOWER SourceFire Configuration (28)
To install an update, click the install icon and select the FirePOWER modules you want to push this update to.
ASA FirePOWER SourceFire Configuration (29)
For major software updates, it requires the reboot of the FirePOWER module. It is recommended to perform the update during a maintenance window.

PAN-OS Supported ciphers

Following is a list of supported ciphers for PAN-OS 7.1 and later: SSLv3 Ciphers Supported (No change from PAN-OS 7.0) Non-FIPS mod...