Friday, 30 June 2017

PALO ALTO FIREWALLS SECURITY ZONES – TAP ZONE, VIRTUAL WIRE, LAYER 2 AND LAYER 3 ZONES

Palo Alto Networks Next-Generation Firewalls rely on the concept of security zones in order to apply security policies. This means that access lists (firewall rules) are applied to zones and not interfaces – this is similar to Cisco’s Zone-Based Firewall supported by IOS routers.
Palo Alto Networks Next-Generation Firewalls zones have no dependency on their physical location and they may reside in any location within the enterprise network. This is also illustrated in the network security diagram below:
Palo Alto Firewall Security Zones can contain networks in different locations Figure 1. Palo Alto Firewall Security Zones can contain networks in different locations
The above topology illustrated shows VLANs 1011 ,12 and 2 managed by a Cisco Catalyst 4507R+E Switch and are all part of OSPF Area 0 and visible as routes in the Palo Alto Firewall. A Layer 3 aggregated link has been created between the Palo Alto Firewall (Interface ae1 on each firewall) and the Cisco 4507R+E Switch (Port-Channel 1 & 2).
When aggregation interface ae1.2 on the Palo Alto Firewall is configured to be part of the DMZ Security Zone, all networks learnt by the OSPF routing protocol on interface ae1.2 will be part of the DMZ Security Zone.
Creating a Security Zone involves tasks such as naming the zone, assigning the interfaces to the new zone created and more. Palo Alto Networks Next-Generation Firewalls won’t process traffic from any interface unless they are part of a Security Zone.
The diagram below depicts the order in which packets are processed by the Palo Alto Firewall:
Initial Packet Processing – Flow Logic of Palo Alto Next-Generation FirewallFigure 2. Initial Packet Processing – Flow Logic of Palo Alto Next-Generation Firewall
It is without doubt Zone based firewalls provide greater flexibility in security design and are also considered easier to administer and maintain especially in large scale network deployments.
Palo Alto Networks Next-Generation Firewalls have four main types of Zones namely as shown in the screenshot below:
  • Tap Zone. Used in conjunction with SPAN/RSPAN to monitor traffic.
  • Virtual Wire. Also known as Transparent Firewall.
  • Layer 2. Used when switching between two or more networks.
  • Layer 3. Used when routing between two or more networks. Interfaces must be assigned an IP address.
Types of Security Zones in Palo Alto Firewalls 
Figure 3. Types of Security Zones in Palo Alto Firewalls
Palo Alto Networks Next-Generation Firewalls have special zone called External which is used to pass traffic between Virtual Systems (vsys) configured on the same firewall appliance. The External zone type is only available in the Palo Alto Networks Next-Generation Firewalls which are capable of Virtual Systems and also the External Zone is visible only when the multi-vsys feature is enabled.

CREATING A SECURITY ZONE

This section focuses on creating different types of Security zones in Palo Alto Networks Next-Generation Firewalls
Step 1. Login to the WebUI of Palo Alto Networks Next-Generation Firewall
Step 2. From the menu, click Network > Zones > Add
Creating a new Zone in a Palo Alto Firewall
Figure 4. Creating a new Zone in Palo Alto Firewall
Step 3. Provide the name for the new Zone, and select the zone type and click OK:
Creating a zone in a Palo Alto Firewall
Figure 5. Creating a zone in a Palo Alto Firewall
In a similar manner we can repeat steps 1 to 3 to create TapVirtual Wire or Layer 2 security zones.
Finally it is important to note that the zone names is case sensitive, so one needs to be careful as the zone FiewallCX and firewallcx are considered different zones:
Identically named Security zones using different letter cases result in different Security zones
Figure 6. Identically named Security zones using different letter cases result in different Security zones
 Example of case sensitive security zones with identical zone names
Figure 7. Example of case sensitive security zones with identical zone names
Creating a security zone in Palo Alto Networks Next-Generation Firewalls involves three steps:
Step 1. Specify the Zone name
Step 2. Select the Zone type
Step 3. Assign the Interface
The interfaces part will be dealt in upcoming posts as one need to understand types of interfaces Palo Alto Networks Next-Generation Firewalls offers and how they work.
In Palo Alto Networks Next-Generation Firewalls zone names have no predefined meaning or policy associations, basically they are created to group the services by functions for examples one can group all the Domain Controllers in one security group no matter even if they are part of different networks.
 Example of grouping Domain Controllers in same security zone – DMZ
Figure 8. Example of grouping Domain Controllers in same security zone – DMZ
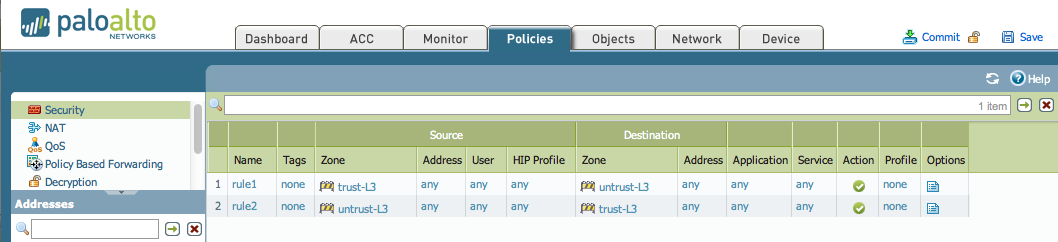
As mentioned Palo Alto Networks Next-Generation Firewalls works with the principle of Security zones, by default Intra-Zone traffic is allowed and Inter-Zone traffic is denied. More technical articles can be found in our Palo Alto Network Firewall section.

All New Application Command Center in Palo Alto

The Application Command Center (ACC) is an interactive, graphical summary of the applications, users, URLs, threats, and content traversing your network.The ACC uses the firewall logs to provide visibility into traffic patterns and actionable information on threats. The new ACC layout includes a tabbed view of network activity, threat activity, and blocked activity and each tab includes pertinent widgets for better visualization of traffic patterns on your network. The graphical representation allows you to interact with the data and visualize the relationships between events on the network so that you can uncover anomalies or find ways to enhance your network security rules. For a personalized view of your network, you can also add a custom tab and include widgets that allow you to drill down into the information that is most important to you.
ACC - First Look
TabsThe ACC includes three predefined tabs that provide visibility into network traffic, threat activity, and blocked activity.
WidgetsEach tab includes a default set of widgets that best represent the events/trends associated with the tab. The widgets allow you to survey the data using the following filters:bytes—in and out,sessionscontent—files and dataURL categoriesthreats— malicious, benign, and count.
TimeThe charts or graphs in each widget provide a real-time and historic view. You can choose a custom range or use the predefined time periods that range from the last 15 minutes up to the last 30 days or last 30 calendar days.The time period used to render data, by default, is the last hour updated in 15 minute intervals. The date and time interval are displayed onscreen, for example at 11:40 is:01/12 10:30:00-01/12 11:29:59
Global FiltersThe global filters allow you to apply a filter across all tabs. The charts/graphs apply the selected filters before rendering the data.
Risk FactorThe risk factor (1=lowest to 5=highest) indicates the relative security risk on your network. The risk factor uses a variety of factors such as the type of applications seen on the network and their associated risk levels, the threat activity and malware as seen through the number of blocked threats, compromised hosts or traffic to malware hosts/domains.
SourceThe data source used for the display.On the firewall, if enabled for multiple virtual systems, you can use the Virtual System drop-down to change the ACC display to include all virtual systems or just a selected virtual system.On Panorama, the Data Source can be Panorama data or Remote Device Data. Remote Device Data is only available when all the managed firewalls are on PAN-OS 7.0.1 or later.When the data source is Panorama, you can filter the display for a specific device group.
ExportYou can export the widgets displayed in the current tab as a PDF.

Thursday, 29 June 2017

How to Configure a Layer 2 to Layer 3 Connection on the Palo Alto Networks Device

Configuring a Layer 2 to Layer 3 on a Device
  1. Configure a Layer 3 interface and connect it to your Layer 3 network.
  2. Configure a Virtual Router and a Layer 3 zone (append the Layer 3 interface to the virtual router and the Layer 3 zone). Be sure to configure the appropriate default gateway on the Virtual Router.
    Capture10.PNG.png
  3. Configure a Layer 2 interface and connect it to your Layer 2 network. Also create a Layer 2 zone and append this interface to it.
  4. Configure a VLAN interface with an IP address that is in the same broadcast domain as the Layer 2 network. Place this VLAN interface in the same Virtual Router as in step 2. Create a zone specifically for the VLAN interface and append this VLAN interface to that zone.
  5. Configure a VLAN and append the Layer 2 interface and the VLAN interface to it. 
    Note: For PAN-OS 5.0 and earlier, also enable Layer 3 forwarding on this VLAN.
  6. Configure policies that allow traffic from the zone that has the VLAN interface to the zone that has the Layer 3 interface. You can also configure a policy allowing traffic from the zone that has the Layer 3 interface to the zone that has the VLAN interface.
  7. In the network scenario on the diagram below, I wanted the PC to be able to reach the Internet cloud and I wanted to allow access in to the PC (Remote Desktop) from the Internet cloud. Thus, I configured an inbound NAT rule (destination NAT and and outbound NAT rule (source NAT). Please refer to the additional screen captures below to see the NAT rules that I configured.
  8. Remember to commit.
Basic Network Diagram of Layer 2 to Layer 3 Setup
1.png
The Network Tab for the physical interfaces and the VLAN interface (the interfaces used were 1/3, 1/9, and vlan.1):
Capture11.PNG.png
Capture12.PNG.png
Required security policies
Screen Shot 2014-10-07 at 9.48.49 AM.png
The configured NAT rules
Capture14.PNG.png

Wednesday, 28 June 2017

How to Implement ECMP (Load Balancing) on the Palo Alto Firewall

Overview

Equal Cost Multipath (ECMP) is a new feature introduced in PAN-OS 7.0. It provides multipath support for "equal cost" routes going to the same destination. There is a max of 4 equal cost paths supported

Without this feature, if there are multiple equal-cost routes to the same destination, the virtual router chooses one of those routes from the routing table and adds it to its forwarding table; it will not use any of the other routes unless there is an outage in the chosen route.

ECMP load balancing is done at the session level, not at the packet level—the start of a new session is when the firewall (ECMP) chooses an equal-cost path

This article focusses on basic configuration to achieve ECMP on the firewall

Details

Topology used for this article:
=======================

Topology.png


Interface configuration:

Interface.png

Note: ethernet1/1 and ethernet1/11 are ISP interfaces configured in different zones L3-Untrust and VPN respectively. However, these interfaces can be configured in same zone also


Route configuration with both default routes having "equal-cost":

Screen Shot 2016-09-05 at 4.20.12 PM.png

NAT policy to be able to route traffic over internet:

NAT diff zone.png

Note: If both ISP interfaces are in the same zone, then destination interfaces need to be added to the NAT policy as in the following screenshot:

NAT same zone.png


Security policy configuration to allow the traffic: (covers both scenario when interfaces are in same or different zone)

Policy.png


Enabling ECMP on the firewall:


ECMP enable.png

Note:
- Max Path 2 means that only 2 equal cost paths will be installed in FIB table. If there are more than 2 equal-cost paths that need to be installed in FIB table, change Max Path value. Max supported value is 4.
- Load balance method can be selected according to the requirement. For more information about load balance algorithm, please click here
- Enable Symmetric Return if reply packet should be sent out the same interface that the request packet came in.


Verify ECMP is working:

Monitor > Traffic Logs (with different zone)

Screen Shot 2016-07-17 at 3.21.44 PM.png


Monitor > Traffic Logs (with same zone)

Screen Shot 2016-07-17 at 3.19.44 PM.png


Route installed for ECMP has a "E" flag in it:

Screen Shot 2016-07-17 at 3.22.34 PM.png

FIb table.png

How to Configure ISP Redundancy and Load Balancing in Palo Alto

Definitions
  • ISP Load Balancing is used when more than one internet provider is connected to the firewall. Policy-Based Forwarding (PBF) is used to forward traffic based on the source subnet.
  • ISP Redundancy is used when one service provider is down and all traffic needs to be routed to the remaining service provider.

Normally, the firewall uses the destination IP address in a packet to determine the outgoing interface. The firewall uses the routing table associated with the virtual router to which the interface is connected to perform the route lookup. Policy-Based Forwarding (PBF) allows the user to override the routing table, and specify the outgoing or egress interface based on specific parameters such as source or destination IP address, or type of traffic.

The following topology includes:
Two internal subnets
  • Subnet1: 192.168.1.0/24
  • Subnet2: 172.16.1.0/24
Two ISP gateways
  • ISP1: 10.30.6.254
  • ISP2: 10.30.1.254

Two important items to remember:
  • PBF rules are applied either on the first packet (SYN) or the first response to the first packet (SYN/ACK). Application-specific rules are not recommended for use with PBF.
  • Address translation (NAT) rules are not applied unless a security rule matched the connection, which is why security rules need to be in place for the address translation to work.


Configuring Redundancy
Primary ISP configuration:
  • Create a PBF rule that forwards traffic to the default gateway.
  • Attach a tunnel monitoring profile and set the action as "disable on failure."
pastedImage_20.png
Monitoring Profile:

This configuration forces all traffic coming from the 192.168.1.0/24 subnet to egress out of Ethernet 1/3.
A Monitor Profile is set up to monitor an IP address. In the test config, monitor profile "multiple isp" is used to monitor a public DNS 8.8.8.8.

When the monitor can no longer reach this IP address, the defined action (fail-over), takes place. The PBF rule is disabled and the firewall falls back to the static route created in the virtual router, as shown below. Path monitoring verifies connectivity to an IP address so the firewall can direct traffic through an alternate route. The firewall uses ICMP pings as heartbeats to verify that the specified IP address is reachable.

A monitoring profile allows specifying the threshold number of heartbeats to determine whether the IP address is reachable. When the monitored IP address is unreachable, the user can either disable the PBF rule or specify a fail-over or wait-recover action. Disabling the PBF rule allows the virtual router to take over the routing decisions.
 
Secondary ISP configuration
  • Create a static route with a normal metric


Configuring Load Sharing

Example 1: Load balancing with no backup
In this case, PBF is used to force traffic from different subnets through the respective ISP.  In this scenario, all traffic from subnet 192.168.1.0/24 is forwarded out of Ethernet 1/3, and subnet 172.16.1.0/24 is forced out of Ethernet 1/4.

Rules:
    • Rule 1: Subnet 192.168.1.0/24 going to 0.0.0.0/0 next hop is ISP 1
    • Rule 2: Subnet 172.16.1.0/24 going to 0.0.0.0/0 next hop is ISP 2


Example 2: Load balancing and redundancy
In this case, PBF is used to forward traffic out of a particular interface based on the source
A backup is configured if the ISP goes down.

Rules:
    • Rule 1: Subnet 192.168.0.0/24 going to 0.0.0.0/0 next hop is ISP 1
    • Rule 2: Subnet 172.16.0.0/24 going to 0.0.0.0/0 next hop is ISP 2
    • Backup for Rule 1: Subnet 192.168.0.0/24 going to 0.0.0.0/0 next hop is ISP 2
    • Backup for Rule 2: Subnet 172.16.0.0/24 going to 0.0.0.0/0 next hop is ISP 1
pastedImage_22.png
Rule 1 and Rule 2 perform the same action as Example 1.
The backup rules allow traffic to go through the ISP that has connectivity in case either were to fail.

PAN-OS Supported ciphers

Following is a list of supported ciphers for PAN-OS 7.1 and later: SSLv3 Ciphers Supported (No change from PAN-OS 7.0) Non-FIPS mod...